Sending a Camera to Space
Well, it’s not really space, but rather “near-space” – an area between that Armstrong Limit and the Kármán Line. It looks a whole lot like space, but you’re not technically there yet (see What’s a HAB?). If you’re going to send a camera up on a weather balloon to the edge of space and back there are a lot of different ways you can do so. Most high altitude weather balloon flights that are performed by amateurs will feature onboard cameras to capture the breathtaking views from a place that most humans can never get to themselves. If you’re trying to set an altitude record, you may want to do without the camera to keep your flight weight down, but the first time around, you’ve got to get some photos!
What type of camera to use
One of the first things you’ll need to decide is what type of camera to use. Do you want to capture photos? videos? What’s your budget? How will you power it?
These are all the questions you’ll need to consider. Most flights will use a small action camera, like the GoPro. These small action cameras are great, because they’re small, lightweight, weather resistant and can withstand the cold temperatures of the upper atmosphere. They’re also easy to use and you can simply start recording on the ground and let it run for the remainder of your flight. The actual GoPro brand cameras are great, but they are pricey. If it’s your first flight, you may want to consider something less expensive, in case you lose it. All of our flights since OLHZN-3 use Lightdow LD4000 Action Cameras. These cameras take fantastic footage and are very inexpensive. We actually love them so much that we include 3 of them on most of our flights.
Another popular option, especially for technology fanatics, is using a Canon camera with custom firmware via the Canon Hack Development Kit (CHDK). The CHDK allows you to load custom firmware onto your Canon camera to control the camera programmatically. Our first two flights, OLHZN-1 and OLHZN-2 implemented this method with some very inexpensive Canon PowerShot Cameras to run our first test flights. The three most common operations with the CHDK are:
- Write a script to record video on a loop
- Write a script to take a picture on an interval
- Connect a CHDK powered camera to an Arduino or Raspberry Pi to have a computer control when to take photos and/or videos through the camera’s USB port.
Finally, another popular camera option is to use a camera built specifically for the Arduino or Raspberry Pi platforms such as the ArduCam for Arduino or the Raspberry Pi Camera Module. These cameras are fun to use and play with and are often extremely small and compact which saves a lot on weight and space.
Camera Battery Life
Your high altitude weather balloon flight is generally going to last somewhere between 90 to 180 minutes so you’ll need to consider battery life for your cameras. Most action cameras like the GoPro or the Lightdow LD4000 cameras are able to capture continuous video for only 45 minutes with their stock battery so you’ll need to consider adding an external battery pack to your camera to keep it powered on for the entire flight. Using an external battery pack can be tricky, though. It’s very difficult to add an external battery to a small Canon PowerShot Camera. It’s a little easy to add to small action cameras and very easy to add to the ArduCam or Raspberry Pi Camera since you can just ensure to provide extra capacity to your Arduino or Raspberry Pi’s battery supply.
If you’re adding an extended battery pack to an action camera, you’ll want to make sure that you camera can record at the same time that it is charging. Also, be sure that once the camera is fully charged that it doesn’t cause your battery pack to turn off. Some battery packs will continue to trickle power to the camera once fully charged, some battery packs will completely shut off once it’s fully charged. That means, if you launch a fully charged camera, it may never use the battery pack and die mid-flight. Ideally, use a battery pack that doesn’t shut off once fully charged. If you can’t find one, a trick would be to start your flight with a drained camera battery. The first half of your flight will record video while your camera is charged, then if the battery pack shuts off once charged, you should hopefully be able to finish out the flight with just the camera’s native battery.
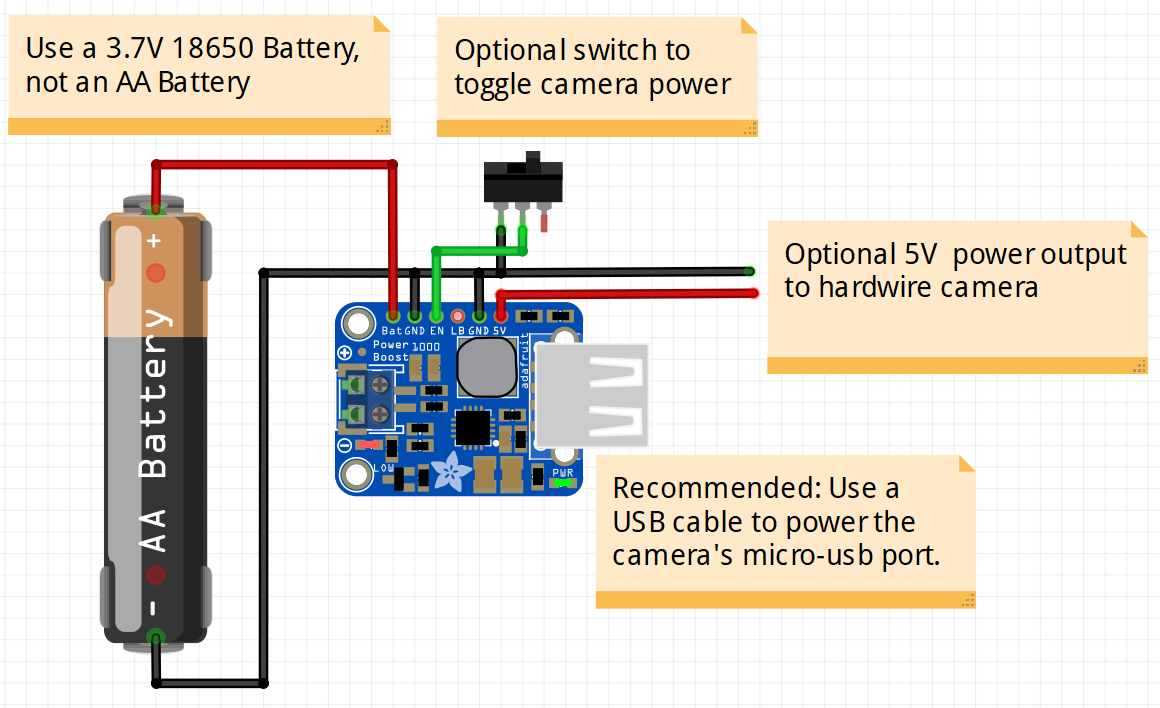
For us, we use our own custom built power management system that’s really quite simple. We use some high-capacity 18650 batteries to power our Lightdow LD4000 cameras. These batteries are only 3.7V, though, and our cameras need 5V. To rectify this, we use an Adafruit PowerBoost 1000 to step up the voltage to 5V. With this method, we can use just one battery per camera and the Lightdow LD4000 action cameras can record full 1080p video for 3 to 6 hours – i.e. the entire flight!
Camera Lens Choice
One thing you’ll want to consider is what type of camera lens you’ll want to use during your flight. Most action cameras like the GoPro or the Lightdow cameras will have an ultra wide-angle lens, otherwise known as a Fisheye lens. There is a lot of controversy about the use of Fisheye lenses on high altitude weather balloons simply because a fisheye lens will indeed cause strong distortion on the image you’re capturing. The benefit of a fisheye lens is that you can capture a wide angle of the Earth and you’ll see more of the ground features over a wider distance. However, if you’re trying to see the actual curvature of the Earth and/or prove the the Earth is round (or flat if that’s your theory), then a fisheye lens isn’t going to help you in this goal since it will inevitably distort the curvature of the Earth in the distance. There are software products that will remove and correct the fisheye lens distortion afterwards, if needed. Both Adobe Photoshop and GoPro Studio have built in tools to remove and correct fisheye distortion. For us, we stick with the fisheye lens. It doesn’t bother us. We like the extended field of view and our goals aren’t to prove that the Earth is round (or flat) so it’s not something we’ll be changing anytime soon, although we do get hundreds of comments everyday from people that dislike our use of fisheye lenses.
If you hate the look of a fisheye lens, then you’ll either need to find an aftermarket replacement lens for your actions camera or use a different type of camera. Aftermarket replacement lenses do exists, mostly for just the GoPro brand items, but they are hard to find. Your best bet would be to use a Canon camera with the Canon Hack Development Kit (CHDK) instead so you can full control what camera lens you use for your footage. Usually this is a more expensive route to go, but the best method if you’re trying to see the actual curvature of the Earth.
Don’t forget, though, that the Earth is very large! Your balloon will only reach about 20 miles in altitude. This is only 8% of the altitude of the International Space Station and means that you’re only going to see 5% of the Earth’s diameter. Although you can certainly measure curvature from this altitude, you’ll need a clear cloudless day for hundreds of miles and a high quality camera to measure the (minimal) curvature at that altitude. See this curvature simulator which shows what you can expect to see for curvature at 30,000 m (98,425 ft). Note that the simulator input uses altitude in meters not feet.
Earth Curvature Simulation at our maximum altitude of 34,291 meters (112,506 ft):
Camera Capture Mode
One final thing to consider is the capture mode you want to use to obtain your imagery. You can choose to take photos on at certain intervals or record video of the entire flight. For us, we record the entire flight with video and then we use VLC Player to take snapshots of the video to obtain still photos of the flight from the video footage we recorded. One thing we recommend when recording video is to set your video recording to be captured on a loop. This means that instead of creating one giant video file, you should instruct the camera to stop and save your recording every few minutes and start a new video file. For us, we do this every 5 minutes. At the end of our flight we have a few dozen video files in 5 minute increments. The benefit of this is that if anything happens to your camera during the flight, you can at least recover some video from a portion of the flight that had no issues. For example, on OLHZN-5, our landing occurred on high voltage power lines which caused our final video clip to become corrupted when it struck the power lines. Since we were recording in 5 minute increments, we had multiple clean video files from earlier in the flight so not all was lost. If we were recording 1 giant video file, we could have potentially lost everything. Fortunately, we were able to repair the final video file to recover the footage so we got lucky there!
Another tip we have is to use dashcam mode, if possible. This is an optional method, but one we use on every flight. The Lightdow LD4000 cameras are capable of running in dashcam mode which means as soon as they receive power, they will turn on and begin recording without any extra button presses. To make launch day easier for us, we mount our cameras in place and simply attach the battery power to start the camera recordings. We don’t have to worry about pressing the record button or mounting our cameras at launch time which makes things more efficient since everything is mounted and prepared the night before. One caution, though, is that if you’re going to use dashcam mode once the SD card is full, it will loop around and start overwriting your oldest video files. Make sure your SD card has enough storage space to outlast your camera batteries. We use 32 GB Class 10 micro SD cards to ensure we have enough space. Ideally, we’d like to use 64 GB SD cards, but the Lightdow LD4000 cameras only support up to 32 GB so we’re stuck with 32 GB for now. Most action cameras will require Class 10 SD Cards at a minimum which ensures that the card can save the data fast enough for HD video recording.
Lastly, check and test your cameras for electromagnetic interference with your GPS tracking systems. Particularly, this is a common issue on action cameras when they are in close proximity to your GPS electronics. The circuits that write the video data to the onboard SD cards can be noisy (electronically speaking). Our cameras are wrapped completely in copper tape to create a faraday cage around the camera and reduce the interference the camera causes. Additionally, we use an active GPS antenna which also helps weed out interference and performs better than cheaper ceramic passive antennas.


